
DIY: Chevron Chairs
Hello readers! First off, my apologies for falling off the face of the earth yesterday — I had work, then class, then more work, then I had to take some time for me, and once that was all said and done, I had run out of precious time to post! But now I’m back with a pretty fun DIY project that looks a lot more challenging than it actually is. I love DIY projects but I mostly limit myself to the ones that feel manageable like, oh I’ll just braid a headband or string a necklace or tie dye this shirt. I had never attempted DIY home decor until now, but after having such great success, I may need to revisit my Pinterest board and see what else I can do to get my apartment that much closer to being my dream living space (think a cross between the Anthropologie and West Elm catalogues).
Okay, so enough of this intro, here’s how you too can make old dining room chairs look new again!

1. Start with some old chairs. These were given to my apartment by an apartment of senior friends when they were moving out at the beginning of this summer. I think they were originally found on Craigslist for free. We needed outdoor furniture for our balcony and I spent the whole summer dreaming about how I wanted to redo them. While we’re now using them outside, this can be done with any sort of dining room/living room chair. I would say the key to any DIY project is to not invest in the original piece you’re redoing — it takes the pressure off feeling like you have to make it look perfect.
2. Next, go to your local hardware store and pick up spray paint and sand paper. I have definitely come to rely on the staff at my local Ace Hardware to point me in the right direction with these types of projects. Because I was painting the chairs for outdoor use, I asked for spray paint that could hold up through DC’s weekly monsoons. I ended up settling on this spray paint in the Satin Aqua.
3. Flip the chairs over and unscrew the seat cushions from the chairs and set aside. The seat cushion should easily come off once you have unscrewed it.
4. Sand each chair to prep before spray painting. I did this to get any old chipped paint off the chairs, but I wasn’t a perfectionist about it. I still like that they look a little “worn in” so it’s up to you how crazy you want to get with sanding. Next, lay down newspaper and start spray painting, giving each chair about two coats worth of paint. I would recommend covering your nose and mouth and doing this step outside because the fumes can get pretty bad.

5. Once you have beautifully painted chairs, it’s time to tackle the cushions! You will need a staple gun, outdoor/indoor fabric, scissors and the old cushion.


6. Spread the fabric out and lay the cushion directly in the middle with the top of the cushion facing down. Staple one side of the fabric to the bottom of the cushion, then pull the fabric as taut as possible, and staple the opposite side. Your cushion should now look like this:

7. Continue stapling in a line on each side, remembering to keep the fabric taut. Then cut some of the excess fabric off the bottom of the cushion, leaving enough to cover the bottom end. Gather the fabric as tightly as possible at one corner of the cushion and staple. Staple along the bottom edge until you reach the other corner. Gather tightly, then staple again.


8. Repeat step 7 for the top end of the cushion.

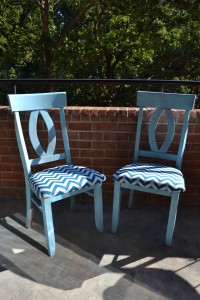
And…… voila!

Beautiful chairs!

Which cost me less than $25 to redo!

Looking forward to enjoying the cool nights of fall sitting on my balcony in these chairs. What other DIY projects would you like to see on SLB? Tweet me and let me know!
Hope everyone is having a great day! I think I may go for a run — it feels like forever since I’ve run outside, but the sunshine is calling my name. But before I go, a sneak peek at tomorrow’s post:

♥


NEW Post on See. Like. Blog. : DIY: Chevron Chairs http://t.co/eR71VjSj